 HOME HOME |
ARTICLES |
FORUMS |
COLUMNS |
GALLERY |
STORE |
SPONSORS |
CONTACT US |
BRIDGES
A COMMENTARY BY DOUG MEYERSunday March 19th, 2006
 The Home Depot Frame Check
I loaded the bike up on the lift, stripped the chassis and tires, installed the new forks, and was just about to start working up a set of strings.
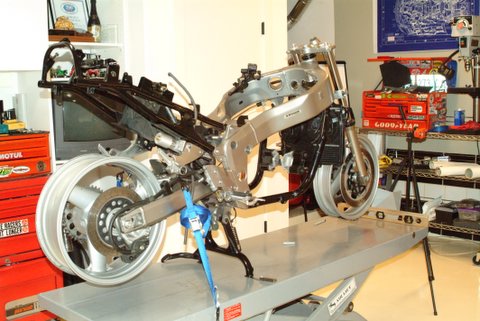
The first step in this process is to see that the bike is level, vertical to the ground. This has to start with leveling the flat surface of the lift. But, as soon as I went to the drawer to grab the level, I had kind of a \"lightbulb\" moment, as my eyes lit upon the $39.95 Black and Decker laser level that I had purchased in the hope that I could hang pictures with only one nail hole in the wall, rather than the usual 3 or 4 it usually took me.
Strings? I don\'t need strings, this is 2006. I have a LASER! Here\'s the process I used. It was accurate, easy, and fun. It took about as long to do it as it will take me type the description of the process.

As I said, first thing is to put the bike on a level surface, then level the bike. No magic here, just put some shim under the center stand as necessary to level the bike. You\'ll need a couple accurate bubble levels, a small one to get into tight areas and a long one to view errors over a longer distance where they become more apparent. I choose to use the engine mount bolts as a reference as they are intended to be perpendicular to the output sprocket and wheels, and parallel to the axles. I take it on faith that they are usually pretty close. After leveling the lift with shims, I needed about 2mm under the right leg of the side stand to get the bubble in the center of the level on the top rear engine mount bolt.
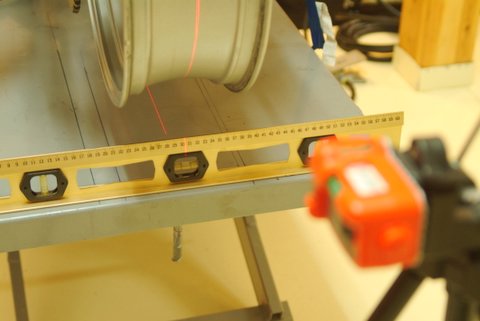
Then, with the laser level on a (camera) tripod, and turned to the vertical mode, I leveled the laser which put the red light line exactly vertical. As I positioned the laser onto the rear of the rear brake disk-presto, the laser line was exactly on the edge of the disk, verifying that the bike was vertical. This shows that the swing arm was not \"tweaked\", because if it was, the disk would not have been vertical.
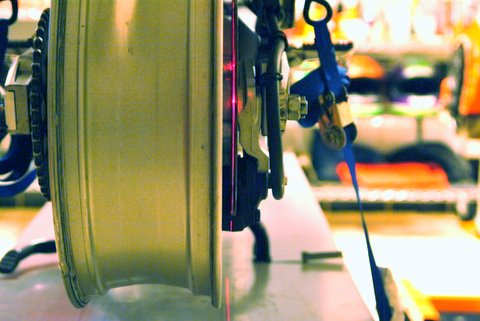
At this point I spun the rear wheel against a dial indicator to determine if it was bent. It wasn\'t, so next I used the laser to create a box around the wheels, just as I would have done with strings, only it was much easier with the laser. Remember, the rear wheel is verified as vertical, so by taking an accurate straight edge and placing its\' edge against each side of the rear wheel at two vertical points at the front side edge and two at the rear side edge, I can end up with four points drawn on the work stand, two on each side of the rear wheel. It\\\\\\\'s easy then, to put the laser line on these points and, using a marker, draw line on the work surface. This line is the \"string\".

In the course of this part of the exercise I learned that the stock chain marks are about 1/2 a graduation off on the right side.
Those laser \"string\" lines are extended forward on either side of the front wheel, and in the same manner as on the rear, again using the inside edge of the vertical straight edge, I was able to center the front wheel by adjusting until I have equal distances on each side, fore and aft, between the guide lines drawn on the work stand.


The next thing I need is a centerline reference underneath the bike. Back in pre-LASER times, I would have taken the calipers and measuring from each outside edge of the front and rear rims I would have found the center of the rim and hung a plumb bob in a string off the rims to a point on the work surface below. The resulting point should be halfway between the previously drawn marks made from the wheel rim edges. You should be able to stretch a string or draw a line straight under the bike, and the centers of both wheels should fall in line. If they don\\\'t the frame has a \"bend in the middle\".

Moving around to the front, I checked the horizontal true of the front wheel/fork assembly by putting the 24\" level on top of the front wheel and, with the laser level in the horizontal mode and leveled, placed the laser line on the edge of the level. The proof of the whole assembly being true is the laser line running true over the 24\" length of the level.

Now, here is the REALLY cool part of this deal, something you just could not do with the strings. By rotating the laser level back to the vertical mode, and by putting the laser line right on the front wheel\'s centerline scribe marks, you can follow the vertical line from the centerline on the work surface, up through the center of the front wheel, and all the way up to the top of the steering head. Any misalignment of the front forks or \"twist\" in the steering head would stick out here like a Canadian in Florida. Look closely at the photo and you can see the laser line run right along the machined surface of the front fairing mount boss.


So there you have it. Hi-tech laser frame checking in your garage for less than 50 bucks! If something happens and you need to check your frame, just to be sure if it\'s hurt or not, it\'s now easier than ever.
Posted by Doug @ 23:20 - Permalink - 3 Comments - 0 Trackbacks
Tags: motorcycles
Comments
thanks! I would have NEVER thought of this in a million years!
AWESOME!
From fish_antlers on 2006-06-27 22:37 - Permalink
Doug,
this is indeed a cool way to do it; I WILL try it!
From entropy on 2007-01-16 06:23 - Permalink
that is amazing. wish i would have known your own little spot existed (to write stuff here) years ago!
From whitehendrix on 2009-03-08 23:02 - Permalink
TrackBacks
No Trackbacks
THE AUTHOR

Doug Meyer has been working with race engines professionally and as a hobby for the past 45 years. He has built engines for everything from dragbikes and cars to outboard race boats, from the famous Can-Am sports cars and an F-1 car to motorcycle streamliners. He spent many years as a professional race team member and engine builder. Everything from nitrous to nitro, Doug's had his hands in it. He has set 16 Bonneville speed records...
Click here to continue
Click here to continue
RECENT ENTRIES
- The Brits call it an "Off"
- Makin' Stories......
- A Veterans Day Story
- I sold my 1098.... And here's why
- Torque - The question you didn't ask
ArchiveAll photographs by Doug Meyer unless otherwise noted